These are the pictures of the room that they will be in in order as if you were walking through the room.
 These windows are the first thing you see on the far wall.
These windows are the first thing you see on the far wall. Turn the corner (picture an J shape and now you're at the bottom of the J)
 Arriving to the closet (at the end of the J...you have no idea what I'm talking about do you? ha! My husband tells me all the time, things that make sense to me don't necessarily mean that they make sense to others). It's a fairly big closet but we'll definitely need to add some shelves to maximize the space. All of this junk you see in the pictures are from the previous owner.
Next, I wanted to remember exactly what I had in storage (it's been almost a year!!) so I pulled up some archived pictures of the kids rooms.
 This is Will's nursery from our previous home in Raleigh. My intent was to transplant the entire scheme since he only slept in here ONE DAY by the time we moved. That curtain was my first sewing project and I was so proud of it that I didn't even care I made it too small. Oh my. I see it now!
 Close up of his Dwell Studio bedding I bought off of Craigslist.
 Greta's room. I can't find a close up online of the quilt, but it is a patchwork pattern with a various degree of pale pinks, reds, blues and greens and cream.
These next ones are pictures I found from Oh Dee Doh.
I love a rainy Saturday morning to surf through fun pictures like these!
 I was so inspired by the color palette in this room. I never thought I would agree with gray in a kids room, but I'm a total believer now!
 I love how the main furniture elements are wooden with neutral walls and the splashes of color are found in the objects decorating the room. This will work well to bring in the combination of my kids stuff to decorate with such as Gretas' pink latern with Will's red latern.
 I love all the browns and wood use in this room. I think I'll do the gray on the walls and do chocolate as accents (which you already see with the dresser in Will's room that I hope to squeeze in this room somehow...) We already have the hardwood floors so we've got that going for us. Then, add in all the fun colorful stuff and call it good!
 This next room, although a baby girls room, just shows the eclectic, vintage look that I love and am will try to accomplish in the room. From the funky frames, repurposed furniture, and that ladder...yes please.
 But the one thing I absolutely love in here is that pallet bed used as a reading nook with the old door headboard. I showed it to Adam this morning and he's not totally sold on the caster wheels, but I suggested table legs instead and he thought it might work. I totally think I could do this for Greta's bed since the walls are so low where they start to slant upwards. She wouldn't need a headboard as it'd be more a sideboard to give the look of a bed and not just a bunch of pallets in their room. Then again, when she's older and starts telling people she sleeps on pallets, it may not work after all. :) I love it anyhow.
 I'm pretty sure I don't have the wall space for this, but I love the collection of letters I found at Project Nursery used with all different fonts and colors to pull all the other colors in the room together. I love that button for the O and for a lot of the other letters, the mom mod podged scrapbook paper on some that she had collected over time. She did a great job.
 She pulled this picture from Design Sponge and this is the exact color palette I've been mulling over and over in my mind! It's so great to see someone took my idea and put it picture form! Okay, okay, well I could never have come up with something so chic, but I'm totally thinking marigold shutters and that dark blue on my porch floor. Loves it.
 This was another idea that Katie pulled from Restoration Hardware and it couldn't have been better timing for me to stumble upon this!
 Awful, awful picture I know. But, it's the coolest key that actually says "Master Key" on it. This is one of two old keys we've come across in the house reno. Now I'm totally excited to do this...

 I really hesitate to put this out there because on my screen it looks like a


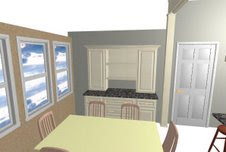
 This unit of cabinets will serve as a pantry.
 This hanging unit of cabinets is something he drew up, but we have decided NOT to go with it. It does limit our storage that much more, but with it being right next to a pass-thru we don't want it to obstruct traffic in any way.


 The only difference with this picture is that we forgot to include a dishwasher! I know we're living in a 1920's house, but this girl does not do dishes 1920's style. It will be sandwiched between the sink and the fridge. I just bought a matching set stainless, Jenn-air fridge and dishwasher off of Craigslist and I think they will look great next to each other.

 Although lovely, I don't think this hutch will fit on this wall with our big dining room table. So, we'll have to nix that also. Yes, that means that even more lost storage, but I think we have a piece of furniture that is smaller and will work fine instead. Once we get our table out of storage and can take true measurements, we may decide later to do this.
 And this is the "after"! I love the stark contrast against the white. Some of you have mentioned the lovely putting green on the front porch and that is a hole in one straight to the dumpster. The white curved railings we hope to sandblast the paint off of that and repaint them black probably. I'm taking suggestions of what to paint the shutters and the cement color of the floor now (the part that is currently red). I'm thinking a grayish blue for the floor and maybe a navy for the shutters? I also like a yellow too for shutters so like I said, I'm totally open to any ideas you have!
 The door at night in the dark. We decided to ditch the storm door for 2 reasons. 1. The porch is deep enough we don't feel like we need it. 2. The new door looks cooler when it's not hiding behind glass.
 Close up
 The hardware is an antique pewter we ordered online. We didn't want to do black and we didn't want shiny silver either so we felt this was a good compromise and are VERY happy with it.
 We decided to do regular tempered glass for around $60.00 as opposed to $300.00 worth of custom glass with iron work. That's something I want to learn down the road and I think once I could figure out how to do the iron work I might be able to create the lattice look that I want right on top of our current panes. I plan to hang up cute little farm-y curtains though so people can't see right inside.
 It even looks good with watermelons casually leaning up against it.
 Well, that window has since been replaced by this lovely set of french doors!

 And since we're on the topic of decorating, the color on the top is the one we chose to paint with. It's called Hazel by Sherwin Williams. I'm not normally a fancy paint brand kind of girl, but the Labor Day special was 25% off so we splurged on this color and our main color for the downstairs. As for the wood on the walls around the house, this wall had some termite damage as you can see by the discoloration. Being an exterior wall (or at least used to be before they added the sunroom) we were not too surprised. We've had the house inspected and although we don't have a current problem with termites, we can pay a little bit for a treatment and prevent them in the future. All to say is, we love the look of exposed wood on the walls, but this one might get covered back up with sheetrock.
 I have a ton of wood pulled down from the walls of our house. Most we plan to use for flooring, but we had salvaged a bunch of smaller pieces for me to use for crafty projects like such.
 I got to work quilting together some of the wood, piecing them together so that the seams wouldn't match and it would look like we had taken it straight off the wall in one unit.
 After I nailed them into a thin piece of luan plywood, I freehanded a favorite place of mine and home for 21 years onto the boards getting braver each time beginning with a pencil, pen and finally a paint pen.


