This is what you would see as you enter the living room from the entry way.


 This unit of cabinets will serve as a pantry.
 This hanging unit of cabinets is something he drew up, but we have decided NOT to go with it. It does limit our storage that much more, but with it being right next to a pass-thru we don't want it to obstruct traffic in any way.
 The glass cabinets on the left are ones that we are recycling from the old utility room. The island will be custom made from a friend of ours in Raleigh.

 The only difference with this picture is that we forgot to include a dishwasher! I know we're living in a 1920's house, but this girl does not do dishes 1920's style. It will be sandwiched between the sink and the fridge. I just bought a matching set stainless, Jenn-air fridge and dishwasher off of Craigslist and I think they will look great next to each other.

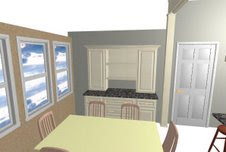 Although lovely, I don't think this hutch will fit on this wall with our big dining room table. So, we'll have to nix that also. Yes, that means that even more lost storage, but I think we have a piece of furniture that is smaller and will work fine instead. Once we get our table out of storage and can take true measurements, we may decide later to do this.

 And this is the "after"! I love the stark contrast against the white. Some of you have mentioned the lovely putting green on the front porch and that is a hole in one straight to the dumpster. The white curved railings we hope to sandblast the paint off of that and repaint them black probably. I'm taking suggestions of what to paint the shutters and the cement color of the floor now (the part that is currently red). I'm thinking a grayish blue for the floor and maybe a navy for the shutters? I also like a yellow too for shutters so like I said, I'm totally open to any ideas you have!
 The door at night in the dark. We decided to ditch the storm door for 2 reasons. 1. The porch is deep enough we don't feel like we need it. 2. The new door looks cooler when it's not hiding behind glass.
 Close up
 The hardware is an antique pewter we ordered online. We didn't want to do black and we didn't want shiny silver either so we felt this was a good compromise and are VERY happy with it.
 We decided to do regular tempered glass for around $60.00 as opposed to $300.00 worth of custom glass with iron work. That's something I want to learn down the road and I think once I could figure out how to do the iron work I might be able to create the lattice look that I want right on top of our current panes. I plan to hang up cute little farm-y curtains though so people can't see right inside.
 It even looks good with watermelons casually leaning up against it.
 Well, that window has since been replaced by this lovely set of french doors!

 And since we're on the topic of decorating, the color on the top is the one we chose to paint with. It's called Hazel by Sherwin Williams. I'm not normally a fancy paint brand kind of girl, but the Labor Day special was 25% off so we splurged on this color and our main color for the downstairs. As for the wood on the walls around the house, this wall had some termite damage as you can see by the discoloration. Being an exterior wall (or at least used to be before they added the sunroom) we were not too surprised. We've had the house inspected and although we don't have a current problem with termites, we can pay a little bit for a treatment and prevent them in the future. All to say is, we love the look of exposed wood on the walls, but this one might get covered back up with sheetrock.
 I have a ton of wood pulled down from the walls of our house. Most we plan to use for flooring, but we had salvaged a bunch of smaller pieces for me to use for crafty projects like such.
 I got to work quilting together some of the wood, piecing them together so that the seams wouldn't match and it would look like we had taken it straight off the wall in one unit.
 After I nailed them into a thin piece of luan plywood, I freehanded a favorite place of mine and home for 21 years onto the boards getting braver each time beginning with a pencil, pen and finally a paint pen.


 Hello vaulted ceiling! (those vertical beams won't be staying...)
 Under the beadboard, there was insulation. The first time Adam and I discovered this, we were not prepared for this and left after 30 minutes with the black lung hacking up and covered with fiberglass shards from the insulation. It was awful. As you can see, I came prepared for the next day.


